Finding your favorite tube of mascara has turned into a clumpy, unusable mess is a classic morning frustration. You reach for the wand, expecting a smooth glide, but instead, you pull out a dry, flaky brush that leaves your lashes looking spiky rather than voluminous.
While many people suggest using contact lens solution or eye drops to rehydrate the product, those items aren’t always on hand or safe for everyone’s specific eye sensitivities. Learning how to fix dried mascara without eye drops is a practical skill that saves money and keeps your beauty routine moving forward without an emergency trip to the store.
Understanding Why Mascara Dries Out
Mascara dries out primarily due to the introduction of air into the tube during daily use. Every time you pull the wand out and pump it back in, you push oxygen into the mascara tube, which accelerates the evaporation of the solvents in the formula. Over time, these solvents—which keep the liquid smooth and pliable—deplete, leaving behind the thicker waxes and pigments. Once the internal environment of the tube changes, the product loses its consistency, leading to the dreaded “clumpy” application. Recognizing that air exposure is the enemy is the first step in managing your collection.
If you notice your mascara is becoming difficult to apply, it’s usually because the ratio of wax to solvent has shifted. While some thickening is normal as the product ages, a complete loss of glide indicates it’s time for a minor intervention. Keep in mind that mascara has a limited shelf life; usually, three months is the standard recommendation for hygiene.
If your product is older than that, no amount of rehydration will make it safe or effective. However, for a tube that is only a few weeks old and simply sitting in a cold room or suffering from air exposure, these recovery methods are highly effective.
1. The Hot Water Bath Technique
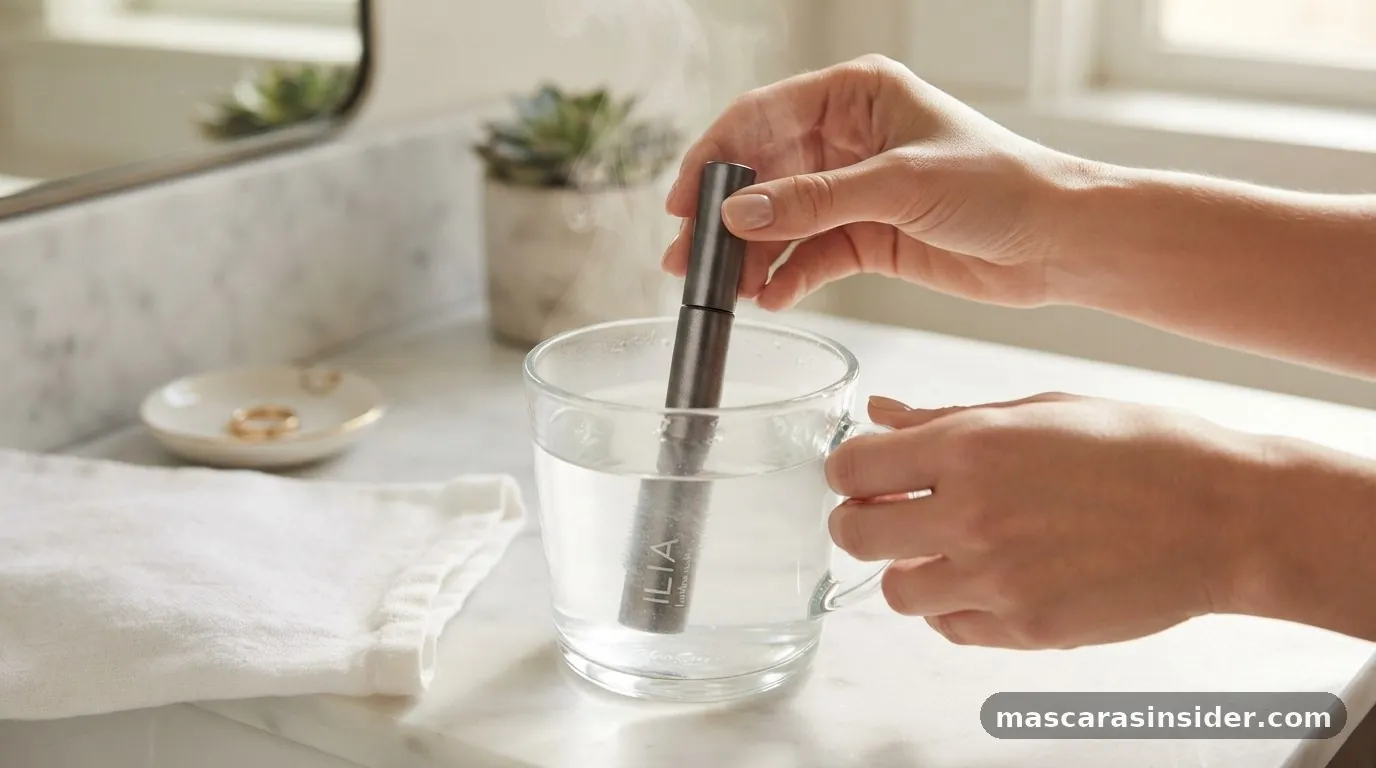
The most reliable way to fix dried mascara without eye drops is to use the gentle power of heat to soften the waxes inside the tube. This method works by warming the hardened ingredients, allowing them to liquefy slightly without diluting the formula with outside liquids. Simply fill a mug or a small bowl with hot water—not boiling—and submerge your tightly sealed mascara tube for about three to five minutes. The heat transfers through the plastic or metal casing, loosening the product clinging to the sides and the wand.
After the soak, remove the tube, dry it off, and roll it between your palms for a few seconds to distribute the warmth evenly. When you pull the wand out, you should notice a significant improvement in the texture. This technique is particularly useful because it doesn’t alter the chemistry of the makeup.
You aren’t adding water or oils, which means the original performance of the formula remains intact. It’s a clean, safe, and highly effective way to extend the life of your purchase without introducing bacteria or changing the viscosity of the mascara.
2. Utilizing Aloe Vera Gel
If heat alone isn’t enough, you can introduce a small amount of aloe vera to restore moisture. Aloe vera is a fantastic choice because it is generally soothing to the skin and hair, making it a safe additive for your lashes. You only need a tiny amount—think the size of a pinhead—to make a difference. The gel-like consistency of aloe blends well with most standard mascara formulas, helping to smooth out clumps and restore the product to a more fluid state.
To apply this, take a clean spoolie or a toothpick, dip it into your pure aloe vera gel, and carefully push it into the opening of the tube. After adding the gel, close the tube tightly and shake it vigorously for thirty seconds. Then, use the wand to stir the contents inside the tube, ensuring the aloe is fully incorporated.
You will find that this hack helps the mascara glide on smoothly without the irritation that some chemical-based rehydrators might cause. It’s a natural approach that prioritizes eye health while salvaging your favorite beauty tool.
3. Comparing Rehydration Methods
When you are looking for ways to revive your makeup, it helps to see how different household items stack up against one another. While some people swear by specific liquids, others can actually ruin the integrity of the formula. The following table provides a quick reference for common substances used to fix dried mascara and their general impact on the product.
| Method | Effectiveness | Safety Level |
|---|---|---|
| Hot Water Bath | High | Very Safe |
| Aloe Vera Gel | Medium | High |
| Natural Oils (Jojoba/Almond) | Medium | Moderate |
| Micellar Water | Low | Moderate |
As shown in the table, the hot water method remains the gold standard for safety and effectiveness. While oils can be used, they must be used sparingly to avoid making the mascara smudge-prone or difficult to remove at the end of the day. Always prioritize methods that don’t compromise the pH balance or the preservative system of the mascara.
4. The Role of Natural Oils
Using a light, natural oil is another popular hack for reviving a dry tube. Oils like jojoba or sweet almond oil are excellent candidates because they are lightweight and mimic the natural sebum of the skin. If you decide to try this, remember that less is more. One drop is usually sufficient for a standard-sized tube. Adding too much oil can turn your mascara into a greasy mess that transfers onto your eyelids or causes your lashes to lose their curl throughout the day.
The process is straightforward: add the single drop of oil to the tube, seal it, and stir the wand in a circular motion to mix the oil into the formula. The oil helps to break down the hardened waxes and provides a smoother application. This is particularly helpful for “dry” or “lengthening” formulas that tend to get flaky as they age.
By adding a small amount of moisture, you restore the product’s ability to coat the lashes evenly. Always ensure the oil you use is high quality and not expired, as you are applying it very close to the sensitive eye area.
5. Essential Maintenance Tips
Preventing your mascara from drying out in the first place is the best strategy. Many people unknowingly accelerate the drying process by “pumping” the wand in and out of the tube. This action pushes air into the container, which is the primary driver of evaporation. Instead of pumping, try a swirling motion inside the tube to pick up the product. This keeps the air pressure inside the container more stable and prevents the formula from becoming thick and clunky prematurely.
Another important tip is to keep the rim of the tube clean. Dried mascara often builds up on the neck of the tube, preventing it from sealing completely. When the cap isn’t airtight, air creeps in and dries the product out overnight.
Use a makeup wipe or a damp cloth to clean the opening of the tube regularly. By ensuring a tight seal, you protect the internal environment of the mascara and keep it fresh for as long as possible. If you want more information on hygiene, you can consult the FDA guidelines on eye cosmetic safety to ensure you are handling your products correctly.
6. When to Give Up and Replace
While these tricks are excellent for extending the life of your product, there is a point where you must stop trying to fix it. If your mascara smells unusual, has changed color, or causes any irritation or itching upon application, you must discard it immediately. The preservation system in mascara is designed to keep bacteria at bay, but once the formula breaks down or reaches its expiration date, those preservatives may no longer be effective. Using expired eye makeup is a leading cause of eye infections and irritation.
Furthermore, if you have tried the hot water bath, the aloe, and the oil, and the mascara still feels “spidery” or leaves thick, uneven clumps on your lashes, the product has likely reached the end of its useful life. It is better to invest in a new tube than to risk the health of your eyes. Pay attention to how long you have been using the tube.
If it has been over three months, it is time to say goodbye. Being diligent about replacement is just as important as being resourceful with your current products.
7. Addressing Common Questions
Many users find that their mascara dries out faster in certain climates or when stored in bathrooms. Humidity and temperature fluctuations significantly impact the stability of the formula. If you live in a dry climate, you may find that you need to be more proactive about keeping the tube sealed tightly. Additionally, storing your makeup in a cool, dark place rather than a steamy bathroom can help preserve the consistency of the wax.
1. How long does it take for mascara to completely dry?
Most mascaras will start to show signs of drying after two to three months of consistent use. However, if the tube is left uncapped, it can dry out in as little as a few hours.
2. Does adding water to dry mascara help?
It is generally recommended to avoid adding plain water to mascara. Water can introduce bacteria and might not mix well with the wax-based formula, leading to a clumpy or separated texture that doesn’t apply smoothly.
3. Why is my mascara so dry?
Your mascara is likely dry due to repeated exposure to oxygen. Every time the wand is removed and pumped, air enters the tube, causing the solvents in the formula to evaporate, leaving behind the thicker, waxy components.
4. Can I use micellar water to fix it?
While some people use micellar water, it is often not recommended.
Many micellar waters contain surfactants that can break down the mascara formula too much, making it smudge-prone and difficult to wear throughout the day. Stick to oil-based or heat methods for better results.